2018 - Volume #42, Issue #3, Page #35
[ Sample Stories From This Issue | List of All Stories In This Issue | Print this story
| Read this issue]
How To Make A Low Cost Temporary Table Saw
 |
 |

The job called for ripping a big pile of cedar planking but he didnt want to haul his table saw down to the job, and he didnt want to haul the cedar back to his shop. So he came up with an idea for a temporary table saw.
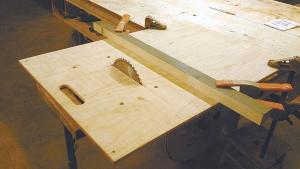
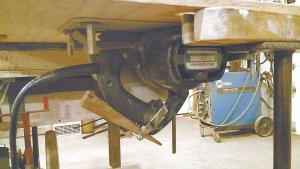
He took a sheet of plywood and cut a slot into it with his hand-held circular saw. Then he set the saw flat over the slot with the blade sticking through it and bolted the saws baseplate to the plywood with four countersunk bolts. Then he flipped the plywood over so the blade extends out the top.
To keep the saw running continuously, Paul wrapped a metal bracket around the trigger and made a small wood wedge that slips under the bracket to apply pressure to the trigger. When he wants to stop the saw, he just pulls out the wedge.
On top of the table he used spring clamps to hold a saw guide in place. And he drew measured gauge lines on top of the table so its easy to rip the cedar at different widths.
It was a good solution to a short-term problem. The saw held up just fine to a bunch of cutting, says Paul.
Contact: FARM SHOW Followup, Paul Tierney, 10020 Pleasant Ave. S., Bloomington, Minn. 55420 (www.pauletierney.com).
Click here to download page story appeared in.
Click here to read entire issue
To read the rest of this story, download this issue below or click here to register with your account number.