2023 - Volume #47, Issue #3, Page #33
[ Sample Stories From This Issue | List of All Stories In This Issue | Print this story
| Read this issue]
Made-It-Myself Engine Testing Stand
 |

You can buy engine run-in stands, but they arent cheap, and as they are large, they involve the added expense of shipping, says Laine.
Laine posted photos and complete details of the building process on his website. As he has multiple times in the past (most recently Vol. 47, No. 2), hes sharing an overview of the project with FARM SHOW readers.
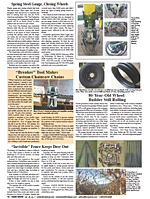
I made the frame with 2-in. square tubing with a base of 30 by 60 in., says Laine. The caster wheels lifted it 7 1/2 in. off the ground, providing room for the engine hoist to roll beneath it.
The frame uses adjustable crossbars with upright arms with motor mounts for the engine to be tested. At the front of the stand, two upright arms with a crossbar provide support for a control panel. Laine mounted a radiator with a fan and a radiator overflow tank to the uprights. Space beneath the radiator provides room for a battery with a disconnect switch, an electric fuel pump with regulator and pressure gauge, and a fuel filter. For safetys sake, he also mounted a fire extinguisher to an upright, as well as a ground.
I used some 3/4-in. square tubing for the control panel frame, which I covered with an aluminum sheet, says Laine. I mounted a tachometer from a boat and a TachMatch to accommodate engines with a different number of cylinders, a voltmeter, an oil pressure gauge, and a water temperature gauge. I put in an extra hole for future use and temporarily filled it with a mechanical oil pressure gauge.
He also installed a starter button and several switches with on-indicator lamps and a fuse per switch. He wired it with an on/off switch for the ignition that also powers the other gauges, a starter switch, a fuel pump switch, and a fan switch. As with the gauges, he added a couple of extra switches for future use.
I used relays in the wiring to switch the fan and another to switch ignition current, says Laine. I used a salvaged starter relay, so the cable connecting the battery to the starter is only active when the starter button is pushed. This is necessary for cars without starter relays but is also compatible with cars that use a solenoid on the starter.
Before having the stand powder coated to protect it from oil and gas exposure, Laine fabricated three common motor adapters, one for a flathead Ford V8, one for small-block Ford, and the last for a Datsun A-series engine transmission. They were simply cradles with inexpensive rubber transmission mounts. The cradles clamp to the main 2 by 2-in. frame, allowing them to be adjusted to match the motor.
At the transmission end, I made a plate that bolts where the transmission typically mounts, says Laine. I drilled patterns in the plate for three common Chevy and Ford patterns. The plate connects to the frame via the same rubber mounts used for the engine cradles.
As Laine used the stand, he made changes as needed. The second motor tested was a Ford 302 stroker motor. It required he add an MSD ignition and coil, as he was using a magnetically triggered distributor that couldnt directly run a coil.
The stand saved a lot of work on the 302, says Laine. I made an assembly error on the motor. I was able to find the problem before installing it and having to pull it again. The motor had an oil pressure issue, and it was nice to have both electrical and mechanical gauges to confirm proper operation of the gauge and the sender.
While working on the 302, Laine quickly discovered the need for a few more changes. One was rewiring the gauges for power separate from the ignition. He also saw the need for a muffler and a way to run exhaust out of the shop.
While working on his third engine, a Datsun A-series, he added a Massey Ferguson tractor muffler. Given the small engine size, Laine mounted it and the transmission to the stand.
Laine placed a link to drawings of the stand on the project page on his website. There isnt complete detail, since some of the parts were fabricated on the fly without drawings, he says.
Contact: FARM SHOW Followup, Brian Laine, 7921 Wade Rd., Arlington, Wash. 98223 (brianlaine@aol.com; www.lainefamily.com).
Click here to download page story appeared in.

Click here to read entire issue
To read the rest of this story, download this issue below or click here to register with your account number.