2024 - Volume #48, Issue #2, Page #38
[ Sample Stories From This Issue | List of All Stories In This Issue | Print this story
| Read this issue]
He Built A Farmall Grader
 |
 |

He took it to an antique tractor show, and everyone thought it was factory built, says Ramsden.
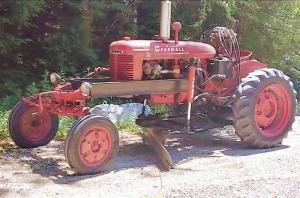
With many years of operating a road grader under his belt, the senior Ramsden knew what he needed for his 1/3-mile driveway. He also understood every component of a full-size grader. After looking for a small Huber or something like it, he decided to build his own. A Farmall Cub just down the road seemed like a good candidate.
It had been used with a brush hog to clear a horse pasture, but then, for 2 years, it just sat, recalls Ramsden. It was a 1941 A with an offset frame.
The owner said it wouldnt turn over, and Ramsden got it for only $500. He tried a few things to free up the engine and finally got three cylinders to fire. When he removed the valve cover, he could see the problem.
The number one lifter had fallen off, says Ramsden. I tapped the rocker arm, and it popped right back on. I turned the crank, and it was running on all four cylinders.
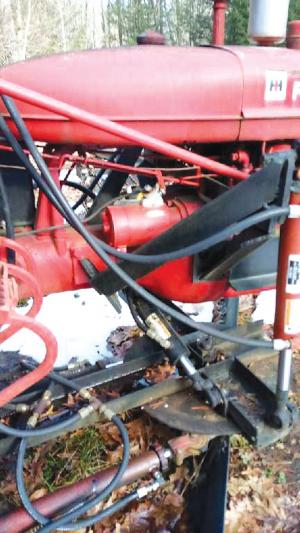
To make room for the blade to swing back and forth, Ramsden used channel iron to extend the frame by 30 in. To make a blade that would roll the gravel, he had an 8-ft. long, 8-in. wide piece of steel bent every inch.
The blade is mounted to a turntable made from 1/2-in. thick, round steel plate. The turntable rotates on a pin welded to the underside of a push bar that extends forward from the tractors rear end. Ramsden used a length of steel from an old dump truck frame for the push bar.
At the rear, the push bar is welded to an 8 in. long, 2 1/2-in. bolt mounted on the end of the push bar. Its inserted through a length of channel iron bolted to the frame. A heavy spring from a snowplow wing sits between the push bar and the channel iron on the frame. Like similar springs on a full-size grader, it absorbs the shock when the blade hits objects.
A length of channel iron, about 2 ft. wider than the tractor frame, is welded across the front end of the push bar. A shorter length of channel iron is welded across the underside of the rear end of the push bar.
Two cylinders mounted vertically to the tractor frame attach to the forward crossbar. They support the front end of the push bar and give Ramsden blade depth control. Two cylinders salvaged from a snowplow mount horizontally to the rear crossbar on the push bar and to tie rod ends from a Mack truck mounted on the underside of the turntable. They control the swivel of the blade.
To give his grader similar blade control to a full-size grader, Ramsden mounted a fifth cylinder between the tractor frame and the front crossbar. It can move the entire front end of the push bar and the blade, extending the reach of the blade a foot to either the left or right side of the tractor.
To power the five cylinders, Ramsden took the generator off the A and replaced it with a hydraulic pump that came out of a 10-ton roller. He found that a 12V car battery was more than sufficient to start the tractor many times without recharging.
I was told the grader was too light to do the work, says Ramsden. It works fine. I put a Fisher cutting edge on it. It lets me keep a good crown on my driveway.
Contact: FARM SHOW Followup, Dave Ramsden, 312 Old Homestead Hwy., Richmond, N.H. 03470 (ph 603-358-9314; dp.ramsden@hotmail.com).
Click here to download page story appeared in.
Click here to read entire issue
To read the rest of this story, download this issue below or click here to register with your account number.