You have reached your limit of 3 free stories. A story preview is shown instead.
To view more stories
(If your subscription is current,
click here to Login or Register.)
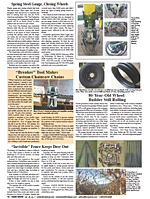
Welding Table Pivots On Bowling Ball
James Muhs built a tilting welding table by using a bowling ball for a pivot point. He got the idea from an adjustable mirror he saw in a jewelry store.
Once I got the idea of an adjustable welding table, using a bowling ball for the pivot point just came to me, says Muhs. I just let the pressure off a littl
..........
You must sign in, subscribe or renew to see the page.
You must sign in, subscribe or renew to see the flip-book
Welding Table Pivots On Bowling Ball FARM SHOP Welders/Torches 64 James Muhs built a tilting welding table by using a bowling ball for a pivot point He got the idea from an adjustable mirror he saw in a jewelry store Once I got the idea of an adjustable welding table using a bowling ball for the pivot point just came to me says Muhs I just let the pressure off a little tilt or rotate the table to suit and then lock it down again Steel for most of the table came from his scrap pile Two old brake rotors used to sandwich the bowling ball came from a salvage yard while the old ball was given to him by an area bowling center Muhs built the table from the ground up starting with feet made from 36-in long 2 by 3-in 5/16-in steel tubing A 26-in long crossbeam of 4 by 4-in 1/4-in thick steel tubing is centered on the feet The crossbeam serves as the base for the jack that locks the table in position It also is the base for the four 27-in long legs made from 3/16-in thick 1 1/2-in square tubing The legs are spaced to allow the brake rotor ring that supports the bowling ball free movement A piece of pipe welded to the bottom of the rotor fits over the head of the hydraulic jacks ram The top rotor is bolted to pieces of angle iron that are in turn welded to the tops of the 4 legs When the jack ram is extended the lower rotor pushes the bowling ball against the upper rotor locking the table into place Initially I drilled a hole through the thumb hole and halfway into the bowling ball for a 3/4-in shaft butt welded to the table recalls Muhs It didnt work as planned When I took pressure off the ball to turn the table the shaft would spin in the ball Muhs solved the problem by drilling a 1/4-in hole beside the original shaft hole He then welded a 1/4-in rod to the shaft I put J-B Weld around the shaft and put it back together with the ball says Muhs Now it works like I wanted Muhs added 2 foot pedal controls to make operating the table even easier A 3 by 4-in pedal is welded to the end of a length of pipe that fits into the jacks piston assembly socket The purchased spring retains the pipe in the raised position He also welded 2 rectangular plates to a round steel plate The plate is welded to the end of a 1/2-in pipe slotted to fit over the release screw on the jack An L-shaped steel strap supports the pipe I simply step down on one of the steel plates to loosen or tighten the release screw says Muhs To tighten the table in place I step on the spring-retained foot pedal to jack the ball up Contact: FARM SHOW Followup James Muhs 4962 N Oak Tree Rd Claremont Ill 62421 jmuhs11@hotmail com
To read the rest of this story, download this issue below or click
here to register with your account number.