2021 - Volume #45, Issue #5, Page #25
[ Sample Stories From This Issue | List of All Stories In This Issue | Print this story
| Read this issue]
“Made It Myself” Metal Bender
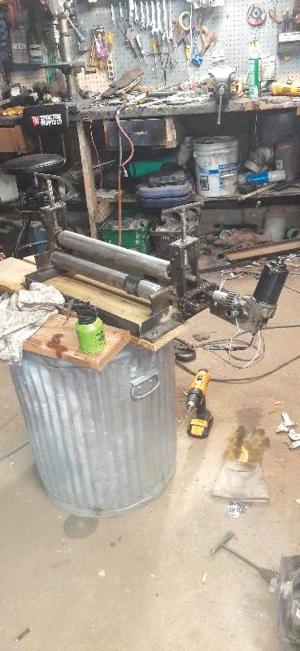 |
“I used angle iron on the ends bolted to steel plate on the one side and angle iron on the other for a 10 1/2 by 20 1/5-in. base,” says Bruhn. “The rollers are 16 1/2-in. long, 2-in. pipe that are mounted to 1/4-in. flat iron welded to the angle iron ends.”
To mount the rollers, Bruhn cut end caps out of 1/4-in. steel and center drilled 5/8-in. holes in them. He welded the end caps in the pipes to stabilize 5/8-in. rods that hold the rollers in place. The rods rest in holes drilled 3 in. apart in the iron plates at the ends of the bender frame, extending out of one end. At that end, Bruhn mounted 2 1/2-in. sprockets for #40 chain to the rods for the lower rollers. The wiper motor is mounted to the end of one rod. It is powered by a 12-volt motor with a switch for on/off and forward/reverse.
The third roller with its rod is mounted in steel collars that ride inside C-channel uprights. The uprights are welded in place to the end plates and angle iron. T-bolts threaded through a U-shaped bracket atop the uprights can raise the roller up to 3 in.
“I used set screws to attach the bracket to the C-channel uprights and to attach the drive sprockets to the lower rollers,” says Bruhn. “If I want to remove the upper roller or the lower ones, all I need is an L-wrench.”
One thing he used it for was to make a cone speaker for his brother’s antique phonograph. “Bending a cone is a matter of cutting the metal in a curve at the top and the bottom,” says Bruhn. “Then, when you bend it, the sides pull together.”
Contact: FARM SHOW Followup, Bradley Bruhn, 157 Indiana St., Palermo, N. Dak. 58769 (ph 701 621-6529; mjosh8231@gmail.com).
Click here to download page story appeared in.

Click here to read entire issue
To read the rest of this story, download this issue below or click here to register with your account number.


