2023 - Volume #47, Issue #3, Page #23
[ Sample Stories From This Issue | List of All Stories In This Issue | Print this story
| Read this issue]
Hitch Turns ATV Into Mini Tractor
 |

I have 12 different implements I use with it, says Sieting. Its also really handy for towing trailers or equipment.
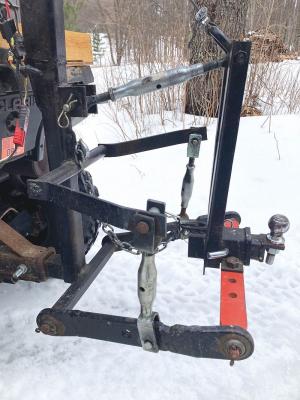
The entire 3-pt. is designed to slide into a receiver hitch on the ATV. At the other end of the hitch, a second receiver hitch is bolted to a drawbar mounted to the lift arms of the receiver hitch.
The arms and the top link are raised and lowered by an electric winch mounted at the top of the front leg of the 3-pt. frame. The leg is a 3-ft. length of steel tubing. The lower 20 in. is 2 by 2-in. steel tubing before transitioning to 2 by 3 in. for the upper 14 in.
Initially, the leg was only 2 ft. long with the winch mounted ahead of it with the lift cable running over a pulley on the leg, says Sieting. I extended the leg by 12 in. and mounted the winch on it for better lift.
At the bottom front of the leg, a 10-in. long 2-in. square stub provides the connection to the ATVs receiver hitch. A 14-in. long 1-in. sq. steel tube is center welded to the back side of the leg with a slightly longer piece of 3/4-in. steel bar stock inside it. The lower link arms pin to either end of the bar stock.
A second length of 3/4-in. bar stock mounted inside a 12-in. length of 1/4-in. thick steel pipe serves as anchor points for stabilizer arms. The pipe is center welded to the main leg about 12 in. from the bottom. The 10-in. long stabilizer arms are held parallel to the lift arms with turnbuckles.
Sieting created an angle iron, top link connection point. First, he welded a short length of 2-in. receiver hitch to a steel plate, which he bolted to the drawbar. He then welded ends of two 20-in. lengths of angle iron to the sides of the receiver hitch. Holes drilled in the upper end of the angle iron make it possible to pin a top link turnbuckle and a small clevis in place.
The other end of the top link turnbuckle is pinned between two square steel plates welded to the front leg of the 3-pt. The winch cable is clamped to the clevis.
I designed the 3-pt. so I can unplug the electrical connection, pull the pin on the receiver hitch and move the 3-pt. to any other 2-in. receiver hitch, says Sieting.
Sieting discovered a problem when using his ATV to dig potatoes. The digger wanted to sink into the ground. To control depth, he welded a chain hook to the upright leg, just above the stabilizer arms mount. A link welded to the receiver hitch on the drawbar provides an anchor for a short length of chain links.
I can control the maximum depth by adjusting the number of links between the hook and the drawbar, says Sieting.
While the 3-pt. hitch worked fine in every application, Sieting was concerned about the ATVs rear suspension getting overloaded. He figured out a simple fix.
There are plates with three holes in them where the suspension attaches to the axles, one on each side, he says. When the suspension comes under load, the plates move outward. I attached a U-bolt to each plate and connected them with a turnbuckle so they cant move apart. I also reinforced the ATVs receiver hitch by adding a brace from it to the frame.
Contact: FARM SHOW Followup, Norman Sieting, Rapid City, Mich.
Click here to download page story appeared in.
Click here to read entire issue
To read the rest of this story, download this issue below or click here to register with your account number.