Scratch-Built, Pull-Type Grader
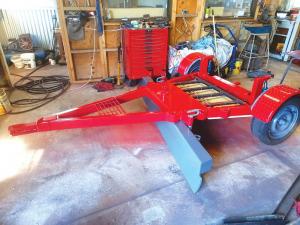 ✖  |
Dale Gunn started with a dirt blade and turned it into a pull-type grader with multiple angles and variable pitch. The clevis hitch rotates 360 degrees for unrestricted movement in all directions. Raising and lowering the utility bar on the tractor hydraulic arms adjusts the blades cutting depth.
The design is simple, as are the components. It would appear to be a well-planned project, but it wasnt.
My builds are all off the cuff, admits Gunn. I have no plans, just a that looks right style. However, my projects usually end up 98% functional, so why change a good process?
Gunn used 13/64-in. steel throughout the project, including the 2 by 4-in. rectangular tubing for the chassis and plate where used. His first step was reinforcing the blade by welding a 4 1/2-in. by 4 1/2-in. square bar to the top, with gusset plates from it to the back of the blade. He also welded a rectangular rub bar to the back side of the beam to help carry the stress. A solid steel center pin was welded to the back of the lower blade and up through the blade bar to hang the blade to the bridge on the graders chassis.
Mounting the bar to the blade this way made it effectively part of the blade front edge, says Gunn. Should the cutting edge become too worn, I can cut it straight and weld on a grouser plate for a new edge.
He added a 1-ft. wide steel grate between the sides of the A-frame chassis and 2 ft. back from the hitch. It reinforces the chassis and reduces operator risk.
Stepping between chassis sides is a good leg breaker, says Gunn. The grate encourages stepping over.
The A-frame chassis stretches 9 ft. 4 in. from the eye of the hitch to the ends of the 4-ft. wide rear axle. The distance from the eye of the hitch to the center pin is 62 in.
The distance between the hitch eye and the center pin lets me make sharp turns with the grader, says Gunn.
The center pin mounts in a bearing in the boss atop the bridge. To make the bridge, I welded two braces across the chassis and three short ones between them, ending at a solid steel collar to house the pin, says Gunn. I covered both sides of the bridge with plates of 13/64-in. steel. Once I had the pin mounted through the collar and the bearing in the boss, I cut off the excess length.
With the blade suspended from the bridge, Gunn set it in a straight-across position, as well as at left and right angles. As he did so, he welded corresponding 4-in. long pieces of steel tubing to sides of the chassis and the blade bar. He fabricated pull pins to slip through the matching pipes for a given angle.
With the blade mounted to the chassis, Gunn moved to the rear end. He cut an old trailer axle in half, shortened it and reinforced it. He then pinned the two halves together at the center of the chassis rear end to create a pivot point. He enclosed the pivot point and added a short hitch plate for future towing needs.
I mounted a vertical arm at each rear corner of the chassis, says Gunn. I set hydraulic jacks between each of them and the axle halves. Raising and lowering opposing jack posts changes the blade pitch as the chassis pivots against the axle.
He cut guard mounts for the wheels from old truck wheel rims to reinforce fenders fabricated from diamond plate steel.
Gunn filled the tires with water for smooth grading. He added more weight by filling the space in the chassis between the bridge and the back end with concrete. Gunn finished the project by setting a wooden storage bin on the concrete deck and partially filling it with more concrete.
Once completed, Gunn gave the grader a good paint job and put it to use leveling surfaces. When needed, he can hook his mini-excavator trailer to it.
Construction time is a bit of a mystery, but Im guessing it took a couple of weeks, says Gunn. Cost is also a mystery as a lot of parts were donated or I already had. However, I likely spent around $1,500.
Contact: FARM SHOW Followup, Dale S. Gunn, 30 Gunn St., Te Anau 9600, Southland, New Zealand (dale.s.gunn@gmail.com).
Click here to download page story appeared in.
Click here to read entire issue
Scratch-Built Pull-Type Grader MISCELLANEOUS EQUIPMENT Earth Movers Dale Gunn started with a dirt blade and turned it into a pull-type grader with multiple angles and variable pitch The clevis hitch rotates 360 degrees for unrestricted movement in all directions Raising and lowering the utility bar on the tractor hydraulic arms adjusts the blades cutting depth The design is simple as are the components It would appear to be a well-planned project but it wasnt My builds are all off the cuff admits Gunn I have no plans just a that looks right style However my projects usually end up 98% functional so why change a good process? Gunn used 13/64-in steel throughout the project including the 2 by 4-in rectangular tubing for the chassis and plate where used His first step was reinforcing the blade by welding a 4 1/2-in by 4 1/2-in square bar to the top with gusset plates from it to the back of the blade He also welded a rectangular rub bar to the back side of the beam to help carry the stress A solid steel center pin was welded to the back of the lower blade and up through the blade bar to hang the blade to the bridge on the graders chassis Mounting the bar to the blade this way made it effectively part of the blade front edge says Gunn Should the cutting edge become too worn I can cut it straight and weld on a grouser plate for a new edge He added a 1-ft wide steel grate between the sides of the A-frame chassis and 2 ft back from the hitch It reinforces the chassis and reduces operator risk Stepping between chassis sides is a good leg breaker says Gunn The grate encourages stepping over The A-frame chassis stretches 9 ft 4 in from the eye of the hitch to the ends of the 4-ft wide rear axle The distance from the eye of the hitch to the center pin is 62 in The distance between the hitch eye and the center pin lets me make sharp turns with the grader says Gunn The center pin mounts in a bearing in the boss atop the bridge To make the bridge I welded two braces across the chassis and three short ones between them ending at a solid steel collar to house the pin says Gunn I covered both sides of the bridge with plates of 13/64-in steel Once I had the pin mounted through the collar and the bearing in the boss I cut off the excess length With the blade suspended from the bridge Gunn set it in a straight-across position as well as at left and right angles As he did so he welded corresponding 4-in long pieces of steel tubing to sides of the chassis and the blade bar He fabricated pull pins to slip through the matching pipes for a given angle With the blade mounted to the chassis Gunn moved to the rear end He cut an old trailer axle in half shortened it and reinforced it He then pinned the two halves together at the center of the chassis rear end to create a pivot point He enclosed the pivot point and added a short hitch plate for future towing needs I mounted a vertical arm at each rear corner of the chassis says Gunn I set hydraulic jacks between each of them and the axle halves Raising and lowering opposing jack posts changes the blade pitch as the chassis pivots against the axle He cut guard mounts for the wheels from old truck wheel rims to reinforce fenders fabricated from diamond plate steel Gunn filled the tires with water for smooth grading He added more weight by filling the space in the chassis between the bridge and the back end with concrete Gunn finished the project by setting a wooden storage bin on the concrete deck and partially filling it with more concrete Once completed Gunn gave the grader a good paint job and put it to use leveling surfaces When needed he can hook his mini-excavator trailer to it Construction time is a bit of a mystery but Im guessing it took a couple of weeks says Gunn Cost is also a mystery as a lot of parts were donated or I already had However I likely spent around $1 500 Contact: FARM SHOW Followup Dale S Gunn 30 Gunn St Te Anau 9600 Southland New Zealand dale s gunn@gmail com
To read the rest of this story, download this issue below or click
here to register with your account number.